Main Components
![]()
SceneInfo
SceneLoading uses a ScriptableObject called a SceneInfo to tie some data to a .unity scene file.
A SceneInfo can be specialized into a RoomInfo, GameplayInfo or MainSceneInfo depending on what your .unity file represents.
For example, if you have a Room in a
Lab.unityfile, you'll need to create aRoomInfoasset for this scene.
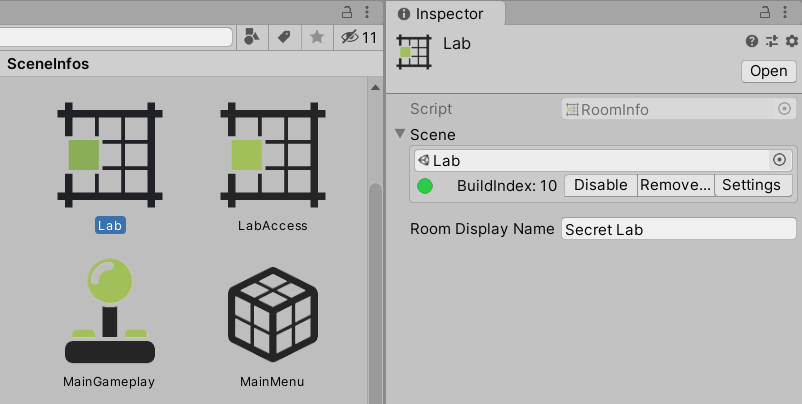
To create a RoomInfo asset, right-click in your Project tab, then go to Create > SceneLoading > SceneInfo > RoomInfo. You can then edit the RoomInfo asset to select the .unity file it corresponds to.

A small utility is also available to generate your SceneInfo assets automatically from your .unity files. For more details about that, head over the Editor Tools section.
Once you have a SceneInfo for each one of your scenes, you can begin connecting your rooms together.
RoomLoader
The RoomLoader component can be used to load a Room B from a Room A.
For example, you may want to load Room B when the player is getting close to a door from Room A.
To achieve that:
At edit time
- In the Room A scene, create a new GameObject
- Attach a
RoomLoadercomponent to it - Select the
RoomInfocorrresponding to Room B (the room you want to load)
At runtime
- When the player is getting close to Room B from Room A, call the
Loadmethod of theRoomLoadercomponent - The Room will be loaded automatically and only if it's not already there
Note: you may want to use the Trigger* component to call the Load method when the player enters the trigger.
* Details about the Trigger component are available in the UniKit documentation.
RoomUnloadManager
![]()
As the player moves between Rooms, you may want to only keep the most recently visited Rooms and unload all the other ones to save some memory.
To use the RoomUnloadManager component, you will first need to track the Room the player is in.
To achieve that:
At edit time
- If you don't already have one, create a
RoomListasset to represent an Area of managed Rooms. To create aRoomListasset, Right-click into your project tab, then go to SceneLoading > Create Room List. You can then add all the Rooms of your Area to this asset - If you don't already have one, create a new
PersistentString* asset to track the room the player is in - In your
Main Scenerepresenting the current Area, create a new GameObject - Attach a
RoomUnloadManagercomponent to it - In the
RoomUnloadManagerinspector, add yourPersistentStringasset tracking the player - Add the
RoomListasset corresponding to your Area - Optionally, set the number of rooms you want to keep in memory
* Details about persistent variables are available in the UniKit documentation.
At runtime
- Rooms will be unloaded automatically to only keep the most recent ones in memory, and the room the player is in never gets unloaded
Important note: the RoomUnloadManager will not unload a Room that does not appear in the given RoomList asset.
Door & DoorPairing
![]()
You may want to have physical doors connecting Rooms together. However, doors can get tricky as one side will be in one Room, but the other is in another Room that may or may not be loaded yet. Opening a door can then become tedious due to the required synchronization between each side.
SceneLoading provides the Door component and the DoorPairing ScriptableObject to solve these issues.
The DoorPairing ScriptableObject ties two RoomInfos together and holds the shared state of each side of the door between these rooms.
To create a DoorPairing asset, right-click in your Project tab, then go to Create > SceneLoading > Create DoorPairing. You can then edit the two RoomInfo to tie together.
In each room to connect, a Door component can be placed on a GameObject (usually the actual door of each room). You can then reference the same DoorPairing asset to synchronize the two doors together.
Don't forget to update the PersistentString tracking the room the player is in. You may want to use Trigger components for that. For more informations about these objects, see the UniKit documentation.